Monday, August 24, 2015

Learn to Make Harissa

Harissa is used Tunisia cooking,(Its located in North Africa) its a very versatile condiment that will change your kitchen experience.

Lately I have been all about the condiments, whole grain mustards, homemade jalapeño jelly, chutneys, relish, spice blends, infused olive oils and I could go on and on. These are so great to have on hand and make your cooking go by so much faster not to mention they take your food to the next level. 

Harissa is one of my favorites because it is so versatile, throw it with grilled pork chops, or shrimp or mussels or stir into any soup even in your vegetables. Its got that nice kick to it too.

2 Sprigs of fresh thyme 
1/2 Tsp coriander
1/2 Tsp cumin
1/2 Tsp caraway seeds
2Tbs of fresh lime juice
3-4 garlic cloves
1 shallot
1/2 cup Olive oil 
1Tbs tomato paste
3-5 red chillies 
(be sure and remove the seeds, as those are what makes them so hot)
Feel free to try different kinds of peppers based off of what you like, like Thai Chilies or red chili pepper and mix them up as well)

If you are using larger peppers like red chili peppers, charr the skin either under the broiler, or if you have gas, let it sit directly on the burner till the skin is charred. Then place in a bowl and wrap with plastic wrap air tight. When they are cool, simply rub the skin off, I recommend wearing gloves if you have them. 

Saute your garlic, shallots and peppers (if using small ones like Thai chillies) in some oil until translucent. Then add your spices until aromatic then add the tomato paste.

Add into a blender with your peppers you have charred add your lime juice and the rest of your olive oil while blending it all together until smooth.

This will change every dish you make. You will start marinating your chicken in harissa or throw it in your meatloaf, its THAT good!

Happy cooking!

Monday, August 17, 2015

Planning a Dinner Party


I got to guest blog this week over at  http://kneedeepinlovely.com

Check out my post on how to plan a low stress dinner party. 

Have a great week! Be sure and check back in next Monday for the recipe of the week. 


Monday, August 10, 2015

Chilled Green Bean Salad

Happy Monday!

Here is a simple chilled salad, perfect for summer time, and goes perfect with grilled BBQ chicken or ribs.

Bring a pot of salted water to a boil, clean your beans by snapping the ends if need be. Depending on how big a batch, you may want to do them in batches, but for home use, you can throw up to two pounds in the pot if your pot is big enough.

You may be familiar with blanching. It's the process of cooking something "al dente" meaning still firm to the bite, it's still got a crisp to it. So, for green beans (and any other green vegetable) it only takes a few minutes, 2-3 minutes. 

Have a bowl filled with ice water (lots of ice) ready. I recommend having a strainer in the bowl to catch the beans so you dont have to dig around in ice water for them. 

After you strain your beans, plunge them into your ice water until they have completely stopped cooking and are chilled. Don't leave them sitting in the water longer than necessary. 

I recommend "haricot" beans which are French beans. They are loaded with more complex, deeper flavors than American beans and are virtually interchangeable with string beans, as we call them. 

Then mix your dressing for the salad.

Red Wine Vinaigrette:

1/4 cup Red wine vinegar 
1/2 cup EVO 
1 Tbs Dijon Mustard
1.5 Tsp honey 
1-2 shallots chopped fine
Half a lemon squeeze optional 
Salt and pepper

Now you can add whatever you like! I like to add feta, red onion sliced thin and a little mint. You could add some cherry tomatoes with some fresh herbs, or some sunflower seeds or some nice roasted fingerling potatoes. 
Dont overload your salad, keep it all about the beans. Chill and then serve. 


Wednesday, August 5, 2015

Chicken...It's What's for Dinner!

Whose roast chicken will reign supreme? Why yours of course!

This is so easy and so yummy. It's the cheapest form of chicken and you can utilize the leftover for chicken salad, or sandwiches, so don't be afraid to simply roast a chicken with your very own twist.

To start, pull your chicken out and let it sit at room temp for about 20 minutes - this helps the meat cook more evenly because you aren't throwing a cold chicken in a 400 degree oven. While your chicken is sitting out, make a general seasoned butter.

I did 1 stick of butter for a 7.5 pound chicken
And I did some fresh herbs, garlic, and lemon zest.

You could choose to do a cajun chicken with spices, or to go more asian with garlic and ginger and lemon grass.  Whatever you fancy.

Get your butter soft enough to mold. (Throw it back in the fridge if it's too runny) Mix all your ingredients with butter. I like to add a little EVO to mine as well for flavor.


Now do as I say and not as I do - I added WAY too many herbs. But we are all human here, am I right?

So, after you have rinsed your chicken and have it COMPLETELY dry, we are going to take our butter under the skin of the breast.

Simply use your fingers to loosen the skin, then ball your butter into two equal balls and press it under the skin, gradually pushing on the top to get it all the way up in there. And then repeat to the other side.

Rough chop some carrots and onions (save some for later) and stuff them in the cavity of chicken, you can add apples or lemons, and fresh herbs in there too. This is going to add flavor and help the chicken hold its shape (same reason we truss it).

This so easy, you're going to wonder why you didn't truss before.


Simply take a piece of string or twine and pull to have two sides of equal length and tie a knot around the neck of the bird. Sides of your twine still equal? 
Now work your way down, starting at the wings. Simply make sure the wings are secure under your twine, then come between the inside of the thighs and bring the legs up and tie the legs together.

Okay, so for roasting you want to put it in a roasting pan "propped" up on veggies (those veggies you saved) - this keeps is from getting soggy and helps the chicken cook evenly, because you have elevated the chicken off the pan. 

Cook at 450 degrees for 20 minutes until skin is nice and crisp, then reduce heat to 350 degrees and cook for 20-25 minutes or until a thermometer reads 160 degrees. 

** I pull mine out at 160 and let it rest for 15 (Yes, I said 15) minutes so that it will carryover to 165 degrees. 

While it's resting, make a pan sauce from your amazing chicken juice in the bottom of the pan. Throw your pan over medium high heat, and toss some flour in the pan - this might seem strange, you have veggies floating around in flour, but go with it. 
Stir until it's absorbed, then scrape up all the goodness off the bottom of the pan. 
Then DEGLAZE. You can use white wine or chicken stock and it should be HOT - you should have lots of steam coming up off your pan.

Then strain into a sauce pan. Cube up some butter and whisk it into your sauce until it is emulsified. Add some fresh herbs and a squeeze of lemon juice.


TA-DA! Dinner is served.

This is great with wilted kale and some home fries rolled in oil till crispy. 


Monday, July 27, 2015

Homemade pasta…why not?

I have so many fond memories of making pasta with my mom growing up. It was always about the experience: getting our hands covered in flour, rolling it out and having pasta hung all over the kitchen and backs of chairs (yes i know, I'm cringing inside too).

What you will need:
A pasta machine. These range from fairly cheap to expensive, I recommend getting a cheap one, then if you like it and you think you will be using it a lot, then you could look into an upgrade.
You will also need a drying rack (or you can get inventive like my mom and hang it all over the house).

3.5 cups UNBLEACHED all purpose flour 
4 eggs
1 teaspoon (Extra Virgin) Olive oil
salt/pepper optional


Pile your flour into a large bowl, make a hole in the middle of your flour pile and add your eggs, oil and seasoning. 
If you wanted to make an herb pasta, you could chop up some fresh basil, thyme, parsley, oregano, or whatever you wanted and add to this mix.

Then, with a fork, vigorously start whisking the wet ingredients and let the dry wall gradually start falling inward as you continue to whisk. 

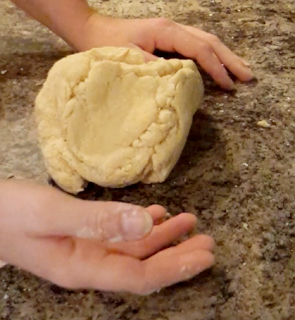
When it becomes hard to whisk, then move it onto a clean work surface and start kneading your dough.


Until it looks like this, it's going to seem dry, use your judgment though and if you feel like it too dry just simply wet your hands and continue working into the dough.  The size of your eggs or the humidity will determine how wet it is at this point. So, you may need to add more flour or water depending on whether it is to sticky or too dry.

Wrap in plastic wrap and let rest AT LEAST 30 minutes. This allows the gluten in the flour to rest and prevents your pasta from being rubbery. If you rush it and don't let it rest, when you go to roll it out it will spring back. That's why you let it rest and why it's important. 

While you are waiting, you can set up your pasta machine, making sure it's secure.

Then slice the dough into two inch slices. You may need to press it a little with your palm or a rolling pin to get it to go through your machine. 
Start with the widest option, usually number one. 
Now what you want to do here is fold and refold till you get nice even lines, don't be afraid to roll it though a few times on each number to achieve a nice clean rectangle shape.
Try not to use anymore flour at this point, it will mess with the consistency, but feel free to use semolina instead.


I usually don't take mine down to the thinnest number, but play around with your machine and the thickness you like, then add the cutter attachment.


Now, I should have cut my pasta sheet in half since it got this long, nobody wants pasta that long. But you get the idea.


Hang it out to dry. 
Once dry, then plunge in boiling salted water, but remember that homemade pasta doesn't take but a few minutes to cook. 

You have so many options when making your own pasta - you can make ravioli with the dough, you can use the sheets for lasagna. You can add spinach or herbs and make any kind of pasta you wish.


Monday, July 13, 2015

Omelet Basics

A friend asked about making omelets. I couldn't be happier to give some tips and share "do's and dont's" when cooking eggs. Let's dive in.

They say that in some French restaurants as an "interview" they ask you to make an omelet, meaning the sign of a great chef is to be able to execute an omelet. Now, after this post you will know how to make an omelet in your head, but half the battle is doing it, be willing to practice over and over and even throw some away. 

First you need the right pan. You need a pan that will allow the egg to slide around freely. You have several different options for pans and it depends on what you like - stainless steel aluminum or carbon steel. The pan should have 2 inch sloped sides and a 7 inch diameter with a long handle. 

If you are making individual omelets you need 2-3 eggs - the depth of the egg mass in the pan should not exceed 1/4 inch - because the egg must cook quickly, otherwise they get rubbery. 

Put your eggs in a bowl and season with salt and pepper, whisk with a fork, 30 good strokes to blend the eggs. Be aggressive here; you want them nice and mixed. 

I'm going to show you the classic roll omelet. This method is trickier, but definitely the most fun. You can do it though!

Place 1 TBS of butter in your pan over high heat. 
As the butter melts tilt the pan so it goes all over. 
Watch the butter, and when the foam subsides and it almost starts coloring that means the butter is ready. It's crucial that your butter is the right temp. Then pour in your eggs.
Let the eggs settle for a few seconds before jiggling or moving the pan, I know that will be your first reaction. 
If your pan is the right size and your butter is the right temperature, you should not need a spatula at all.
Grasp the handle and begin jerking the pan vigorously away from you raising it away from the heat at a 20 degree angle, holding the pan over the heat as you continue to jerk every second. This would be where you add your fillings. 

Then increase the angle at which you are holding your pan slightly, this will force the egg to roll over on itself and with each jerk at the lip of the pan it will continue to roll. Utilize the edge of your pan. As soon as its taken shape let in sit in the pan and let it get golden brown. Simply roll out onto a plate. 

Okay, second is the "scrambled" version.
Same as above with the butter. 
After you add your eggs let them sit and coagulate in the bottom of the pan, then simply take your fork (you don't want something with a large width, you'll see) and simply drag the cooked egg to the center allowing more of the uncooked eggs to reach the bottom of your pan. Keep moving the coagulated eggs until you get the eggs cooked how you like, then start folding onto each other. The bottom should be nice and brown while the middle is nice and soft. 

Suggestions for fillings:

Fresh herbs, parsley, thyme, chives
Cheese: fontina, parmesan, Swiss
Spinach, broccoli or asparagus
Diced potatoes
Ham or chicken
Mushrooms
Shrimp or crab


Monday, June 15, 2015

Pesto

I've started a garden for the first time, so I'm having to come up with twelve different ideas and ways to use basil, tomatoes and cucumbers. Life could be worse.

So as I mentioned I'm growing basil and Holy Basil, so I figured this would be a good time to show you how to make simple pesto. Pesto is so great because you can spread it on sandwiches or - like I'm doing - toss it with some pasta.


For this recipe you will need a processor. You could try a blender, but I recommend a processor.

What you need:

4 cups of fresh basil (about 2 bunches)
Maybe try parsley or a cilantro pesto for tacos.


1/2 cup of toasted pine nuts 
I actually substituted walnuts - play around and try your favorite nuts for a flavor you will love. 

1/2 cup grated Parmesan
Again, use Asiago or Pecorino - just be sure to use a hard cheese.


1-2 garlic cloves

1/2 cup olive oil 
(Refer back to my post on olive oils.)


salt and pepper


I served mine up with some sautéed chicken.


Simply garnish with some fresh grated cheese, maybe throw some tomatoes in there and call it a meal. 

Thanks for reading. Don't forget I LOVE answering any questions you may have.

Tuesday, June 2, 2015

The Perfect Meal From a Grill

'Tis the season for grilling, and I have it on my mind!

GRILLED CORN on the COB

1 Stick of butter
1 Garlic clove minced
1 Tbs. fresh herbs (thyme, parsley, chives)
1.5 Tsp salt
1 Tsp pepper
1 Tbs olive oil
1/2 Cup Parmesan
1/4 Cup of Japanese bread crumbs
4 Ears of corn husked

Turn your grill on medium-high. 
The easiest way I've found is to throw your butter in a heat proof bowl and put it on the grill to melt with garlic, spices and herbs. You'll need a brush.

Brush your corn with olive oil, turn on all sides until all sides are charred and tender. 

Combine Parmesan and bread crumbs.

Remove from grill and brush with your butter mixture. Then roll in your cheese mixture. You can get creative & mess around here, maybe add some pine nuts or crushed up cereal. 

If you don't have a grill, roast it under your broiler.

RIBS with homemade sweet and spicy sauce.

3/4 cup packed light brown sugar
1/4 cup smoked paprika
2 Tbs cayenne pepper (or 1 Tbs crushed red pepper)
2 Tbs garlic powder
3 Tbs salt 
2 Tbs cumin
* Don't feel totally confined to this list of spices, feel free to mess around with the spiciness or substitute some.
2 St.  Louis style pork ribs or baby back (3-4 lbs)
1/2 stick butter
3/4 cup apple cider vinegar

Preheat oven to 325 degrees.

Combine your dry ingredients to make a dry rub. 


Reserve 1/4 cup of mixture for later. Then PAT DRY your ribs with paper towels and rub with remaining mixture. Be sure to really massage and get the rub everywhere. 

Wrap each rack in tin foil crimping the edges to seal. Place on a rimmed baking sheet and in preheated oven. You want your meat to be fork tender but not completely falling off the bone, 2-3 hours. 


You'll notice a lot of liquid on the bottom of your sheet pan, drain off into a container. Let the juices settle so the fat surfaces and you can skim it off. 

Then add the juices from the ribs and the spice mixture, and simmer for about 15-20 minutes until a good basting consistency. Make sure your butter is cold and MONTER AU BEURRE your butter into the sauce (using a whisk gradually add your butter) then add vinegar and season.

** Au Beurre is a french expression that means "with butter". So Monter au beurre means "to mount with butter". It's done as a finishing touch on a sauce to give it a richer flavor and feel.**

Char your ribs on your hot oiled grill and baste with sauce for 5-10 minutes.
Be sure to let your meat rest (ALWAYS let your meat rest) for 5 minutes then slice between the ribs.

For my next post look for a chilled green bean salad, a great side in the summer.


Sunday, May 31, 2015

Flank Steak with Chimichurri

To all my followers, I've decided to get on a more regular schedule of posting, so look for new posts on MONDAYS (and maybe a few more if I'm feeling inspired, but definitely Mondays). Thank you for continuing to follow and enjoy my blog, I do apologize for my long absence.

Since I just shared about indoor grilling, what better way to follow that than with a marinaded flank steak and a chimichurri sauce. Chimichurri is a great sauce for grilled items, like steak, with its bold flavors of fresh herbs and garlic. 

Chimichurri:

1/2 cup red wine vinegar
3-4 garlic cloves, thinly sliced or minced
1 shallot finely chopped
1.2 cups fresh cilantro with stems pick out
1 cup fresh parsley (flat leaf preferred) 
1/3 cup fresh oregano
3/4-1 cup EVO (refer back to my post of Olive oils)
1/2 tsp. cumin
1/2 tsp crushed red pepper (more or less depending on you level of spice)
salt and pepper to taste

Combine all your ingredients except your olive oil in a food processor, while it's running gradually add your oil. Done! 

With the flank steak it is best to marinade (which is a form of tenderizing). You can can go any direction with your marinade, just keep these things in mind when making a marinade:

Salt is essential - it penetrates and goes deeper than the outer surface. Soy sauce is a common form of salt.

Sugar, when used in moderation, will help the meat brown better on the grill, creating strong smoky, charred flavors.

Aromatics are mainly a surface treatment, but they can still be quite powerful. Garlic, shallots, dried spices, herbs, or chilis are all good things to experiment with.

Oil is often a primary ingredient in marinades and helps spread flavors evenly across the surface of the meat, as well as lubricating the meat.

Acid can denature proteins in the meat so use sparingly. With very acidic marinades, it's particularly important to not over marinade or it will get grey and mushy overtime. Vinegar or lemon juice are common acids in marinades.

For Flank steak, ideally you want to marinade 4-8 hours, you don't want to marinade too long or it could change the texture of the meat.  
The secret to a tender flank steak is to cut AGAINST the grain. Flank steak is a great piece of meat to start learning how to cut against the grain. Watch this helpful video:

https://www.youtube.com/watch?v=JRdX4U6hNLY


Thanks for reading, don't forget to comment with what you've been cooking and any questions you have. 


Mcnackskitchen. (2013, April 8) Cutting against the grain on a bias. [Video File] retrieved from https://www.youtube.com/watch?v=JRdX4U6hNLY


Wednesday, May 13, 2015

How to grill inside

A dear friend of mine asked for some ways to "grill" without a grill. I am going to give you a few tips and ideas for "grilling" inside.

First, you will want to invest in a cast iron grill pan - an investment that you will not regret. You can get a pretty good cast iron pan for $35. They are great for quick recipes, but don't really achieve that smokey taste people love.

You may hear people say to "season" your cast iron but what does that mean? You don't ever want to use soap on your cast iron, you simply use 1 TBS of salt (not the real fine stuff but the gritty kind) and scrub/work it into the cast iron. Works like a charm. Depending on how bad it is, you may want to use a steal wool. If you just bought a cast iron pan, simply coat with oil and place upside down in a 325 degree oven, use tinfoil or pan to catch the drippings.

So now that you have your grill pan, you can either get it piping hot on the stove top and grill as usual or you can rediscover your broiler. Think of your broiler as an upside-down grill. Even though you won't get those pretty grill marks or the smoky flavor you'd get from charcoal, you can get a pretty good char. Set your oven rack about 6 to 10 inches from the broiler and use your grill pan, or a pan with ridges, so that the fat is able to run down. As you are cooking you want to check your food frequently so it doesn't burn. After about 4 to 6 minutes pull your steak, pork chop or lamb (whatever you're cooking up) and flip it, then cook for 4 to 6 more minutes for medium rare. One big problem I see with home cooks is constantly wanting to turn and mess with your food to see if it's done - don't do that! Simply trust the clock, and turn it when it says you should. 

So thirdly, I would suggest using smoked spices. For example, hickory smoked salt - which I love - can be found at whole foods, or even online. It's easy to achieve smokiness with spices, so drizzle your fish or vegetables with chili infused olive oil, or smoked paprika. You could even make your own blend with dried chipotle chilies. If you do use liquid smoke be careful not to get carried away, too much and your food will taste like an ashtray. 

Be sure to throw some garlic and fresh herbs on the grill with whatever you're cooking - you could even infuse olive oil with some smoked salt, herbs and garlic and brush it down as you cook. 

Best of luck, let me know what you've been cooking up! 


Sunday, April 19, 2015

To-ma-to, To-mah-to!

My tomato plants are growing so fast and it couldn't be fast enough. I love Spring, gardens, flowers, farmers markets with fresh fruit and vegetables! So vibrant in color it's hard to know where to start - it's all so magical! Tomatoes come in all shapes, sizes, and colors - it's hard not to get excited about them. 

First lets learn a culinary term today - concasse, refers to a tomato that has been peeled, seeded and roughly chopped. 

Get some water boiling and an ice bath ready (this is crucial when it comes to cooking vegetables, you want to be able to plunge your hot vegetables into an ice bath to stop the cooking)

Reasons behind concasse is that sometimes seeds can create a bitter taste and the skin can be tough and not appetizing. I've been that girl that pulls skin from my mouth like a fatty piece of meat, not attractive.

So first score the bottom of your tomato with a small knife in the shape of an X, not too deep. 
Place in boiling water for about 30 seconds (depending on size, but really no more than 30 seconds otherwise mush happens).

Then plunge into ice bath to cool.

The skin should peel off easily at this point. Cut the tomato in half and squeeze the seeds out and roughly chop.

I want to show you how versatile and unique tomatoes can be with some recipe ideas.

Stuffed cherry tomatoes

18 Large cherry tomatoes (try and get a variety of color
1-2 TBS pine nuts
3 TBS EVO (extra virgin olive oil)
1 Zucchini cut 1/4in diced, seeds removed
Garlic crushed
Thyme chopped fine
1 cup basil leaves
Salt and pepper

Concasse your tomatoes, then remove 1/4in from the top after removing the skin.

Scoop out the insides (this might be a little tedious, I suggest using a melon scoop).

Toast pine nuts (I always toast any nut that I cook with because by toasting them you are releasing their natural oils that otherwise you wouldn't. Don't be afraid to get some color on them).

Saute zucchini, garlic and thyme. I suggest using butter here (be creative here, substitute sausage, or nice chunks of sourdough bread). Set aside.

Then combine basil, pine nuts, and EVO in a blender (maybe add some Parmesan cheese here).

Toss with your zucchini mix, season with salt and pepper, and fill your tomatoes, then set aside.

Tomato Dressing

3 Heirloom tomatoes chopped 
2 TBS EVO
1Tsp cornstarch mixed with a dash of water (the consistency should be like half 'n' half, you just made a Slurry).
Dash of hot sauce
Salt and pepper

Cook for one hour in a double broiler allowing the tomatoes to break down, then strain, saving the pulp.

Bring the tomato juice to a simmer and thicken with your slurry. Then puree with the tomato pulp, salt and pepper, and a dash of hot sauce. Maybe throw in some fresh basil or honey if you want it sweet - this is a great dressing base to play with flavors you like. If it's still chunky, you may want to strain it again. Chill.

So here you can build an epic tomato salad.

I would pick up some:
Arugula
Heirloom tomatoes
Ricotta salata (or a nice Parmesan)
Sherry vinaigrette/EVO
If you can find some micro basil it adds such  nice finishing touch.

Slice your heirloom tomatoes to a nice thickness, season with salt and pepper. I suggest letting them drain on paper towels so that they don't bleed all over your plate. 

Dress your tomatoes  and arugula with oil and vinegar (maybe some shallots and garlic and fresh herbs).

Arrange on a platter or plate top with your stuffed tomatoes, arugula, dressing, and cheese. Enjoy this lovely fresh vibrant salad, great for appetizers too!

The possibilities are endless - tomato pie, homemade salsa, bruschetta, or just simply toss them on the grill and enjoy. Come back and we will discuss Gazpacho!

Happy Spring! What is your favorite fruit or vegetable?


Wednesday, April 15, 2015

Cooking with Wine the DOs and DONTs

Cooking with wine is a great way of adding flavor that chicken stock or other liquids can't achieve. People have tons of opinions on this matter - some I agree with, others I don't. But like I always say, it's about preference and knowing your ingredients, it's the same with wine.

First, what is the difference between cooking sherry and sherry?

So, sherry is a fortified wine. Just think for a minute how much sherry could enhance a simple soup, stew or sautéed dish. Not only is it a wine, but it's fortified with whiskey or brandy. Just like wine there are different variations to sherry, I will just discuss two that I recommend for cooking with. If this is something that interests you, you will discover the vast differences and variations, and how this is just the tip of the iceberg.

Amontillado wine has a salty taste, tends to be a little nuttier, and goes well with cheese and fresh greens, like arugula and spiced nuts. I think it tends to go better with lighter meats, like chicken or duck. 

Oloroso is more on the spicy side, full bodied and aromatic lending itself to go well with strong bold dishes, like braised beef and a pungent blue cheese.

Cooking sherry appeals to the woman who doesn't want to spend $10-20 dollars (depending on the type of sherry) and is attracted to being able to screw the lid back on and it keep for seemingly forever (or until next time). If you aren't going to drink sherry and your sole purpose is for cooking, then by all means buy a bottle of real sherry and keep it the fridge, the added alcohol will help keep your sherry longer than most people think. The flavor won't be optimal but its better than buying cooking sherry.

The reasons I don't like "cooking sherry" is that is it just not comparable. Its flavor profile can change your dish for the worse. Cooking sherry is a thin, cheap, watered down wine that has food coloring and salt added to extend the shelf life.

What kind of wine is best for cooking?

You will hear people say, "Don't cook with wine that you wouldn't want to drink." I don't think this is necessarily true - now don"t misinterpret that as a suggestion to buy a $3.99 bottle of wine and think it will taste good in your dish.

You will also hear them say, "Don't cook with old wine." I don't think that is necessarily true either. OF COURSE newly opened wine would be better for freshness of your dish but dont throw away wine that isn't good to drink, simply cork it and refrigerate to keep longer. Plus, after cooking that acidic, "old" taste will be so subtle you won't even notice. 

I'll be honest, I think boxed wine it the best bang for your buck for cooking, you don"t have to fret over tannins and acidity (too much) and you aren't worried about it going bad as quickly as a bottle would. 

So here are a few rules i like to follow.

Rule number one: Don't panic and fret over which wine to choose, I promise you'll be fine!

When picking out a red wine to cook with, it's usually safest to go with a Cabernet Sauvignon. Now, if your recipe calls for a dry red wine, think about what your cooking and the heartiness of it - are you simmering a leg of lamb or sautéing a veal chop? Then you need something with enough body and boldness to pull out the flavors of your meat, so think more along the lines of Petite Syrah. 

A lighter dish like, oh maybe coq au vin, goes well with a chianti. A chianti can range from light to full body, but is usually a dry wine with flavors like tart cherry and is very fruit forward (as a general rule, this isn't ALWAYS true). 

With white wines, I tend to lean more towards Sauvignon Blanc or a buttery Chardonnay. I usually avoid cooking with Reisling because it is sweet, but again if you are poaching pears than maybe you want a sweeter wine.

I hope this gives you more confidence in cooking with wine, and again, like I always say, play around with flavor profiles and you will learn to enjoy picking out a wine to cook with instead of that swelling feeling of anxiety. 

Ask question! Share what you have been cooking this week!


Friday, April 10, 2015

Brussel Sprouts baby

I am a brussel sprout lover and you will be too after these easy recipes. 

Let's jump right in and play around with some different ways to prepare brussel sprouts (oh and we will have non brussel sprout lovers asking how they ever lived without them).

This recipe is so simple and so delicious.

What you will need:
About 1 pound of Brussel sprouts 
(Ok, side note here, please feel the freedom to change the amounts up, with cooking it's not an exact science, if you think it needs more bacon then add more bacon. That is what is so great -you get to explore; just use these measurements as a guideline).

6-8 slices of bacon cut into lardons (remember my trick to toss your bacon in the freezer and then simply cut your bacon into thin strips).

1 Onion

1 Garlic clove chopped 

Butter/ oil for browning 

Salt and pepper 

Start by cleaning your brussel sprouts. Using a pairing knife, trim the root end and then cut the brussel sprouts in half. At this point, the outer layers will easily come off. 

Render your bacon (we talked about this as well in my last post).

Strain off some of the fat, saving for later, but leave a fair amount in the pan. Use your judgement - you may not need to strain off any depending on the bacon you used. 

Remove the rendered bacon from the pan.

I went ahead and posted this short video on how to cut an onion so you can know the different ways - trust me this will change your world in the kitchen.

https://www.youtube.com/watch?v=ZQZtCVkypAo

For this recipe, I like to cut my onion Julianne (thin strips - the first example he showed in the video without the root).

Turn your heat up. Using the same pan you have been using, add some fat to the pan. Add your onion to the bacon grease and don't stir them for a good 5 minutes, then give them a stir.

Turn your heat down, then add your garlic. 
Once the onions are caramelized how you would like them, add them to your bacon.

Now, get the same pan (trust me) really hot. Add your brussel sprouts cut side down if at all possible. The pan should sizzle when you add them. Don't stir - let them get caramelized then flip. You may need to do these in batches. 

Here is where it comes down to you and your preferences. Ff your brussel sprouts are small and you let them sear in the pan long enough you may not need to cook them longer. If they are bigger, you will need to toss them in the oven for a bit to cook them through. Use your best judgment.


Easy, right?
The best part is once you've perfected them, you get to change things up - toss in some fresh lemon juice or vinegar, or bake them with fresh Parmesan cheese, maybe some fresh herbs. 

The second way I like to cook brussel sprouts is to shave them and make into a salad almost. 

For this you will need a mandolin, or a food processor to shave them thin. 

What you need:

2 pounds of brussel sprouts shaved.

Toss with olive oil, salt, and pepper. Spread on a baking sheet and bake in the oven at 450 degrees for about 10 to 15 minutes.

For the dressing:
1/2 to 1 Tbs minced or grated ginger
1 Shallot minced 
1 Garlic clove minced
1/2 cup orange juice
1 1/2 cups rice wine vinegar
1 tsp sesame oil 
1/2 cup olive oil 
1 Tbs honey

Heat oil in a saucepan and add your garlic, ginger, and shallot. 
Sauté them without getting a lot of color on them, then add everything except your oil. 
Simmer, then gradually whisk in your oil. 

Toss your brussels in the dressing and garnish with sesame seeds, green onions, and maybe cilantro, if you like. 

Let me know how those turn out and which one is the bigger hit! 


Youtube. (2012, April 26). How to Chop an Onion with Jamie Oliver. [video file] retrieved from https://www.youtube.com/results?search_query=how+to+cut+an+onion


Friday, March 27, 2015

Coq Au Vin

Hello out there. 

I think today we should talk about foods that you probably cook everyday, and maybe add some twists to them or perhaps answer questions that you didn't even know you had. 

Chicken. The most versatile protein.  

First learning how to fabricate (or break down) a chicken is vital and will serve you well. I find it cost effective and a better yield if I buy a whole chicken and fabricate it myself. Watch this fantastic video on breaking down a chicken and just try it. Trust me.  

https://www.youtube.com/watch?v=PEJSHRSJCn8

Feel better? Great, now let's cook it. We are going to make Coq Au Vin, chicken in red wine with onions, mushrooms and bacon. A classic French chicken dish.

What you will need:
Serves 4 to 6 people

4 to 6 oz bacon 

2Tbs butter

2.5  to 3 pounds cut up frying chicken (this means all those pieces you fabricated yourself, the drum, thigh and breast)

salt and pepper

1/4 cup cognac

3 cups full bodied red wine (Burgundy, cotes du rhone or even a chianti) 

1 to 2 cups chicken or beef or chicken broth (remember we made this a few blogs ago - it's starting to build on each other!)

1/2 Tbs tomato paste

2 garlic cloves smashed (turn your knife sideways and literally smash the garlic, it releases the juices without having to chop it)

1/4 tsp thyme

1 bay leaf

First start by cutting your bacon into lardons. To make it easier, throw your bacon in the freezer for a few minutes. A lardon is basically thin strips of bacon, usually 1/4 inches across and 1 inch in length.  

Get your casserole pan (or stock pot) hot, then add your bacon (if you used lean bacon you may find you need to add some butter).

** Here is a tip for cooking bacon: you want a hot pan before you add the bacon, then turn your heat down low. You might see recipes that say render the bacon, basically meaning we want to extract all the fat out so we are left with crispy bacon (Don't get impatient and try to turn the heat up; trust me just let it roll).

Remove the bacon and set aside. You may notice little bits of bacon on the bottom, don't worry that is flavor we want, you only need about 2 to 3 TBS fat in your pan and medium heat.

Dry your chicken really well (water and grease are enemies and if your chicken is wet it won't get crispy) Salt and pepper really well.

Brown the chicken in your prepared pan.

Return the bacon. Cook together about 10 minutes turning the chicken only once to give it a good sear.

Pour the cognac in, you need to light the cognac with a flame. Shake the pan back and forth till the flame goes out. 

Add the wine. Then add just enough stock to cover the chicken, add the tomato paste being sure to stir it and dissolve it, add the smashed garlic and thyme and bay leaf. 

Cover and simmer for about 25 to 30 minutes, or until the juices run clear when cut. (Braising, like we discussed earlier - yay, don't you love seeing it all come together!) .

Remove the chicken. 

Simmer your sauce, skimming off the fat. Then turn up heat to a rolling boil and reduce to about 2.5 to 3 cups of liquid. Remove bay leaf. 

Ok, now, this is huge and you will use this (and you'll hear me refer to a roux a lot). 

What you need to make a roux:
3 Tbs flour
2 Tbs butter

Melt the butter in a saucepan and then whisk in the flour to  make a paste (Tada - you just made a roux! It can be used to thicken just about anything).

Whisk our roux into the reduced sauce, keep the pan with your sauce on the heat while you whisk in your roux.

**The sauce should at this point coat the back of a spoon, if you run your finger through it, it will keep the line and not run together.
Wallah you now have a sauce!

I'm going to pair my Coq Au Vin with mashed potatoes, cipollini onions and asparagus.

Boil your potatoes in SALTED water. 

** You want to start your potatoes in cold water 

Have you ever made mashed potatoes and them have that gluey texture? Well here are few reasons why that might happen, i have noticed that if you let your potatoes cool before whipping they get gluey. Also how you whip them, by hand is the absolute best (it incorporates air into the potatoes), or a ricer, which i find just as good.

Potatoes can be categorized in two ways, "waxy" and "mealy". Mealy potatoes (russets) have a higher concentration of starch, so they tend to be more dense. We boil then in cold water first because when they are cooked the cells swell and separate from one another, which creates that fluffy texture in mash and baked potatoes. 
Interesting fact, the French use Waxy potatoes for their mash, and they beat them first alone then with butter by hand until they pull from sides. I find that over-beating can also cause gluiness, so I suggest to new cooks to do it the "american" way or through a ricer.

For your cippolini onions, get a pan smoking hot and add some butter and oil, then add your onions with some fresh herbs and salt pepper. After you have seared, then toss them in a hot oven (375 degrees) and cook for about 10 minutes until tender, tossing occasionally. 

Ill discuss Asparagus later when I talk about some great spring side dishes. So come back!

Happy Cooking. 

** Typically means a tip or pay close attention. 


Youtube. (2009, February 21). Gordon Ramsey:How to part a chicken. [video file] retrieved from https://www.youtube.com/watch?v=PEJSHRSJCn8

McGee, Harold. On Food and Cooking the Science and Lore of the KItchen: New York, NY: Scribner, 2004.