Monday, July 27, 2015

Homemade pasta…why not?

I have so many fond memories of making pasta with my mom growing up. It was always about the experience: getting our hands covered in flour, rolling it out and having pasta hung all over the kitchen and backs of chairs (yes i know, I'm cringing inside too).

What you will need:
A pasta machine. These range from fairly cheap to expensive, I recommend getting a cheap one, then if you like it and you think you will be using it a lot, then you could look into an upgrade.
You will also need a drying rack (or you can get inventive like my mom and hang it all over the house).

3.5 cups UNBLEACHED all purpose flour 
4 eggs
1 teaspoon (Extra Virgin) Olive oil
salt/pepper optional


Pile your flour into a large bowl, make a hole in the middle of your flour pile and add your eggs, oil and seasoning. 
If you wanted to make an herb pasta, you could chop up some fresh basil, thyme, parsley, oregano, or whatever you wanted and add to this mix.

Then, with a fork, vigorously start whisking the wet ingredients and let the dry wall gradually start falling inward as you continue to whisk. 

When it becomes hard to whisk, then move it onto a clean work surface and start kneading your dough.
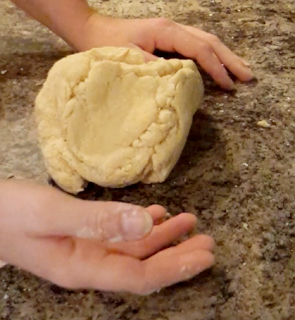


Until it looks like this, it's going to seem dry, use your judgment though and if you feel like it too dry just simply wet your hands and continue working into the dough.  The size of your eggs or the humidity will determine how wet it is at this point. So, you may need to add more flour or water depending on whether it is to sticky or too dry.

Wrap in plastic wrap and let rest AT LEAST 30 minutes. This allows the gluten in the flour to rest and prevents your pasta from being rubbery. If you rush it and don't let it rest, when you go to roll it out it will spring back. That's why you let it rest and why it's important. 

While you are waiting, you can set up your pasta machine, making sure it's secure.

Then slice the dough into two inch slices. You may need to press it a little with your palm or a rolling pin to get it to go through your machine. 
Start with the widest option, usually number one. 
Now what you want to do here is fold and refold till you get nice even lines, don't be afraid to roll it though a few times on each number to achieve a nice clean rectangle shape.
Try not to use anymore flour at this point, it will mess with the consistency, but feel free to use semolina instead.


I usually don't take mine down to the thinnest number, but play around with your machine and the thickness you like, then add the cutter attachment.


Now, I should have cut my pasta sheet in half since it got this long, nobody wants pasta that long. But you get the idea.


Hang it out to dry. 
Once dry, then plunge in boiling salted water, but remember that homemade pasta doesn't take but a few minutes to cook. 

You have so many options when making your own pasta - you can make ravioli with the dough, you can use the sheets for lasagna. You can add spinach or herbs and make any kind of pasta you wish.


Monday, July 13, 2015

Omelet Basics

A friend asked about making omelets. I couldn't be happier to give some tips and share "do's and dont's" when cooking eggs. Let's dive in.

They say that in some French restaurants as an "interview" they ask you to make an omelet, meaning the sign of a great chef is to be able to execute an omelet. Now, after this post you will know how to make an omelet in your head, but half the battle is doing it, be willing to practice over and over and even throw some away. 

First you need the right pan. You need a pan that will allow the egg to slide around freely. You have several different options for pans and it depends on what you like - stainless steel aluminum or carbon steel. The pan should have 2 inch sloped sides and a 7 inch diameter with a long handle. 

If you are making individual omelets you need 2-3 eggs - the depth of the egg mass in the pan should not exceed 1/4 inch - because the egg must cook quickly, otherwise they get rubbery. 

Put your eggs in a bowl and season with salt and pepper, whisk with a fork, 30 good strokes to blend the eggs. Be aggressive here; you want them nice and mixed. 

I'm going to show you the classic roll omelet. This method is trickier, but definitely the most fun. You can do it though!

Place 1 TBS of butter in your pan over high heat. 
As the butter melts tilt the pan so it goes all over. 
Watch the butter, and when the foam subsides and it almost starts coloring that means the butter is ready. It's crucial that your butter is the right temp. Then pour in your eggs.
Let the eggs settle for a few seconds before jiggling or moving the pan, I know that will be your first reaction. 
If your pan is the right size and your butter is the right temperature, you should not need a spatula at all.
Grasp the handle and begin jerking the pan vigorously away from you raising it away from the heat at a 20 degree angle, holding the pan over the heat as you continue to jerk every second. This would be where you add your fillings. 

Then increase the angle at which you are holding your pan slightly, this will force the egg to roll over on itself and with each jerk at the lip of the pan it will continue to roll. Utilize the edge of your pan. As soon as its taken shape let in sit in the pan and let it get golden brown. Simply roll out onto a plate. 

Okay, second is the "scrambled" version.
Same as above with the butter. 
After you add your eggs let them sit and coagulate in the bottom of the pan, then simply take your fork (you don't want something with a large width, you'll see) and simply drag the cooked egg to the center allowing more of the uncooked eggs to reach the bottom of your pan. Keep moving the coagulated eggs until you get the eggs cooked how you like, then start folding onto each other. The bottom should be nice and brown while the middle is nice and soft. 

Suggestions for fillings:

Fresh herbs, parsley, thyme, chives
Cheese: fontina, parmesan, Swiss
Spinach, broccoli or asparagus
Diced potatoes
Ham or chicken
Mushrooms
Shrimp or crab