Friday, July 1, 2016

Fear...NOT


I was listening to a sermon the other day about Elijah, when he prayed for God to appear when the whole city was worshipping false gods and how God showed up in a mighty way and fire came down from heaven. 

A spiritual high right?

But Then Elijah gets a message from Jezebel saying she is "going to kill him". Literally God showed up in this mighty way and then Elijah gets scared and runs for his life.

He was AFRAID and RAN for his life!

BUT the story goes on, God sends an angel to touch Elijah and to feed him. God is providing before Elijah even has time to process the fact that he needs food and drink. (amazing!!!) 

You know my favorite part about this though, the Angel doesn't immediately scold him for running, instead he is meeting his needs.

God cares more about meeting my needs than he does to scold me or point a finger at all my wrongs. I do that ALL on my own.

BUT Elijah then gets up and goes. (I always wonder what goes through their heads at this moment, is it relief, is it fear?) He doesn't drag his feet and wonder if it was the Lord that provided baked bread beside his head while he slept under a tree. No, he Arose and went!

I recently got an answer from the Lord on a very specific prayer and two hours later I got my answer. But my sinful, greedy heart really didn't like the answer I got. Do I really trust God with that area, or am I holding a tight closed fist towards God, asking for help but really only when its convenient for me. 

How long will I keep running like Elijah?


Wednesday, January 13, 2016

The struggle is real

The struggle is absolutely real. 

Its that feeling of working out, but not getting results. You feel defeated and all you want to do is lay on the couch watch Netflix and eat Oreos.

What is the key to success? Some might say, perseverance, or determination. I think its what we are lacking instead, focus. We try to be "great" at too many things and so we are not good at any one thing. We are stretched too thin, and that leaves us feeling like we cant do anything. For me sometimes, (if i'm being honest, all the time) I look at all I don't know, and instead of chipping away a little at a time, I lose all hope of ever knowing or being good at anything. Instead of setting goals I get discouraged before I even decide to do something.  

Im drowning in this pool of self loathing and fear. Fear of man, Fear of failure and fear of being unsuccessful.

Mistakes will eat at your soul and tell you, you are worthless. They seep in when you are most vulnerable, most defeated. The struggle is real, but you have to fight apathy, you have to say "No, I deserve better, I am not a waste"

So this new year might not look different to a stranger, or even to people who know me, but each day I will reset, not looking at yesterday, or even my whole week of falling short, but at today. I will pray to my heavenly father for a reminder that He loves me the same and His love is unconditional.

I will celebrate the wins. And learn from the mistakes.


Monday, August 24, 2015

Learn to Make Harissa

Harissa is used Tunisia cooking,(Its located in North Africa) its a very versatile condiment that will change your kitchen experience.

Lately I have been all about the condiments, whole grain mustards, homemade jalapeƱo jelly, chutneys, relish, spice blends, infused olive oils and I could go on and on. These are so great to have on hand and make your cooking go by so much faster not to mention they take your food to the next level. 

Harissa is one of my favorites because it is so versatile, throw it with grilled pork chops, or shrimp or mussels or stir into any soup even in your vegetables. Its got that nice kick to it too.

2 Sprigs of fresh thyme 
1/2 Tsp coriander
1/2 Tsp cumin
1/2 Tsp caraway seeds
2Tbs of fresh lime juice
3-4 garlic cloves
1 shallot
1/2 cup Olive oil 
1Tbs tomato paste
3-5 red chillies 
(be sure and remove the seeds, as those are what makes them so hot)
Feel free to try different kinds of peppers based off of what you like, like Thai Chilies or red chili pepper and mix them up as well)

If you are using larger peppers like red chili peppers, charr the skin either under the broiler, or if you have gas, let it sit directly on the burner till the skin is charred. Then place in a bowl and wrap with plastic wrap air tight. When they are cool, simply rub the skin off, I recommend wearing gloves if you have them. 

Saute your garlic, shallots and peppers (if using small ones like Thai chillies) in some oil until translucent. Then add your spices until aromatic then add the tomato paste.

Add into a blender with your peppers you have charred add your lime juice and the rest of your olive oil while blending it all together until smooth.

This will change every dish you make. You will start marinating your chicken in harissa or throw it in your meatloaf, its THAT good!

Happy cooking!

Monday, August 17, 2015

Planning a Dinner Party


I got to guest blog this week over at  http://kneedeepinlovely.com

Check out my post on how to plan a low stress dinner party. 

Have a great week! Be sure and check back in next Monday for the recipe of the week. 


Monday, August 10, 2015

Chilled Green Bean Salad

Happy Monday!

Here is a simple chilled salad, perfect for summer time, and goes perfect with grilled BBQ chicken or ribs.

Bring a pot of salted water to a boil, clean your beans by snapping the ends if need be. Depending on how big a batch, you may want to do them in batches, but for home use, you can throw up to two pounds in the pot if your pot is big enough.

You may be familiar with blanching. It's the process of cooking something "al dente" meaning still firm to the bite, it's still got a crisp to it. So, for green beans (and any other green vegetable) it only takes a few minutes, 2-3 minutes. 

Have a bowl filled with ice water (lots of ice) ready. I recommend having a strainer in the bowl to catch the beans so you dont have to dig around in ice water for them. 

After you strain your beans, plunge them into your ice water until they have completely stopped cooking and are chilled. Don't leave them sitting in the water longer than necessary. 

I recommend "haricot" beans which are French beans. They are loaded with more complex, deeper flavors than American beans and are virtually interchangeable with string beans, as we call them. 

Then mix your dressing for the salad.

Red Wine Vinaigrette:

1/4 cup Red wine vinegar 
1/2 cup EVO 
1 Tbs Dijon Mustard
1.5 Tsp honey 
1-2 shallots chopped fine
Half a lemon squeeze optional 
Salt and pepper

Now you can add whatever you like! I like to add feta, red onion sliced thin and a little mint. You could add some cherry tomatoes with some fresh herbs, or some sunflower seeds or some nice roasted fingerling potatoes. 
Dont overload your salad, keep it all about the beans. Chill and then serve. 


Wednesday, August 5, 2015

Chicken...It's What's for Dinner!

Whose roast chicken will reign supreme? Why yours of course!

This is so easy and so yummy. It's the cheapest form of chicken and you can utilize the leftover for chicken salad, or sandwiches, so don't be afraid to simply roast a chicken with your very own twist.

To start, pull your chicken out and let it sit at room temp for about 20 minutes - this helps the meat cook more evenly because you aren't throwing a cold chicken in a 400 degree oven. While your chicken is sitting out, make a general seasoned butter.

I did 1 stick of butter for a 7.5 pound chicken
And I did some fresh herbs, garlic, and lemon zest.

You could choose to do a cajun chicken with spices, or to go more asian with garlic and ginger and lemon grass.  Whatever you fancy.

Get your butter soft enough to mold. (Throw it back in the fridge if it's too runny) Mix all your ingredients with butter. I like to add a little EVO to mine as well for flavor.


Now do as I say and not as I do - I added WAY too many herbs. But we are all human here, am I right?

So, after you have rinsed your chicken and have it COMPLETELY dry, we are going to take our butter under the skin of the breast.

Simply use your fingers to loosen the skin, then ball your butter into two equal balls and press it under the skin, gradually pushing on the top to get it all the way up in there. And then repeat to the other side.

Rough chop some carrots and onions (save some for later) and stuff them in the cavity of chicken, you can add apples or lemons, and fresh herbs in there too. This is going to add flavor and help the chicken hold its shape (same reason we truss it).

This so easy, you're going to wonder why you didn't truss before.


Simply take a piece of string or twine and pull to have two sides of equal length and tie a knot around the neck of the bird. Sides of your twine still equal? 
Now work your way down, starting at the wings. Simply make sure the wings are secure under your twine, then come between the inside of the thighs and bring the legs up and tie the legs together.

Okay, so for roasting you want to put it in a roasting pan "propped" up on veggies (those veggies you saved) - this keeps is from getting soggy and helps the chicken cook evenly, because you have elevated the chicken off the pan. 

Cook at 450 degrees for 20 minutes until skin is nice and crisp, then reduce heat to 350 degrees and cook for 20-25 minutes or until a thermometer reads 160 degrees. 

** I pull mine out at 160 and let it rest for 15 (Yes, I said 15) minutes so that it will carryover to 165 degrees. 

While it's resting, make a pan sauce from your amazing chicken juice in the bottom of the pan. Throw your pan over medium high heat, and toss some flour in the pan - this might seem strange, you have veggies floating around in flour, but go with it. 
Stir until it's absorbed, then scrape up all the goodness off the bottom of the pan. 
Then DEGLAZE. You can use white wine or chicken stock and it should be HOT - you should have lots of steam coming up off your pan.

Then strain into a sauce pan. Cube up some butter and whisk it into your sauce until it is emulsified. Add some fresh herbs and a squeeze of lemon juice.


TA-DA! Dinner is served.

This is great with wilted kale and some home fries rolled in oil till crispy. 


Monday, July 27, 2015

Homemade pasta…why not?

I have so many fond memories of making pasta with my mom growing up. It was always about the experience: getting our hands covered in flour, rolling it out and having pasta hung all over the kitchen and backs of chairs (yes i know, I'm cringing inside too).

What you will need:
A pasta machine. These range from fairly cheap to expensive, I recommend getting a cheap one, then if you like it and you think you will be using it a lot, then you could look into an upgrade.
You will also need a drying rack (or you can get inventive like my mom and hang it all over the house).

3.5 cups UNBLEACHED all purpose flour 
4 eggs
1 teaspoon (Extra Virgin) Olive oil
salt/pepper optional


Pile your flour into a large bowl, make a hole in the middle of your flour pile and add your eggs, oil and seasoning. 
If you wanted to make an herb pasta, you could chop up some fresh basil, thyme, parsley, oregano, or whatever you wanted and add to this mix.

Then, with a fork, vigorously start whisking the wet ingredients and let the dry wall gradually start falling inward as you continue to whisk. 

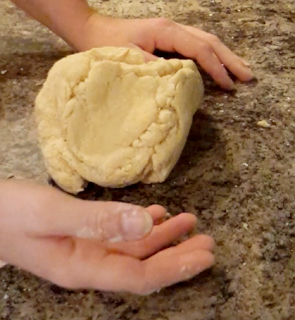
When it becomes hard to whisk, then move it onto a clean work surface and start kneading your dough.


Until it looks like this, it's going to seem dry, use your judgment though and if you feel like it too dry just simply wet your hands and continue working into the dough.  The size of your eggs or the humidity will determine how wet it is at this point. So, you may need to add more flour or water depending on whether it is to sticky or too dry.

Wrap in plastic wrap and let rest AT LEAST 30 minutes. This allows the gluten in the flour to rest and prevents your pasta from being rubbery. If you rush it and don't let it rest, when you go to roll it out it will spring back. That's why you let it rest and why it's important. 

While you are waiting, you can set up your pasta machine, making sure it's secure.

Then slice the dough into two inch slices. You may need to press it a little with your palm or a rolling pin to get it to go through your machine. 
Start with the widest option, usually number one. 
Now what you want to do here is fold and refold till you get nice even lines, don't be afraid to roll it though a few times on each number to achieve a nice clean rectangle shape.
Try not to use anymore flour at this point, it will mess with the consistency, but feel free to use semolina instead.


I usually don't take mine down to the thinnest number, but play around with your machine and the thickness you like, then add the cutter attachment.


Now, I should have cut my pasta sheet in half since it got this long, nobody wants pasta that long. But you get the idea.


Hang it out to dry. 
Once dry, then plunge in boiling salted water, but remember that homemade pasta doesn't take but a few minutes to cook. 

You have so many options when making your own pasta - you can make ravioli with the dough, you can use the sheets for lasagna. You can add spinach or herbs and make any kind of pasta you wish.